Battery switch on travel trailer function is key to managing your RV’s power. Understanding how your battery switch works is crucial for preventing dead batteries, protecting sensitive electronics, and maximizing your off-grid adventures. This guide breaks down the different types of switches, their functionalities, and troubleshooting tips to keep your travel trailer running smoothly.
We’ll cover everything from simple wiring diagrams to more complex setups involving solar panels and inverters. Learn how to choose the right switch for your needs and how to maintain it for years of reliable service. Get ready to become a power management pro!
Battery Switch Types in Travel Trailers
Choosing the right battery switch for your travel trailer is crucial for managing your power sources and protecting your electrical system. Understanding the different types available will help you make an informed decision based on your specific needs and setup. This section details the common types of battery switches and their respective pros and cons.
Single-Pole Battery Switches
Single-pole switches are the simplest type. They control the power flow from a single battery source to the trailer’s electrical system. They’re typically used in trailers with only one battery. A single-pole switch is essentially an on/off switch for your battery.
Double-Pole Battery Switches
Double-pole switches offer more control by allowing you to isolate both the positive and negative terminals of your battery. This added safety feature prevents accidental short circuits and protects against potential damage. They are ideal for trailers with a single battery but provide enhanced safety compared to a single-pole switch.
Double-Pole Double-Throw (DPDT) Battery Switches
DPDT switches are the most versatile option. They allow you to switch between two different battery sources (e.g., your house battery and a starting battery) or to disconnect both batteries entirely from the trailer’s electrical system. This is particularly useful in setups with two batteries, allowing you to easily switch between them or isolate both for maintenance or storage.
Comparison of Battery Switch Types
| Feature | Single-Pole | Double-Pole | Double-Pole Double-Throw (DPDT) |
|---|---|---|---|
| Number of Batteries Controlled | One | One | Two (or ability to isolate both) |
| Safety Features | Basic on/off | Isolates both positive and negative terminals | Isolates both batteries; allows switching between batteries |
| Complexity | Simple | Slightly more complex | Most complex |
| Cost | Lowest | Moderate | Highest |
| Applications | Single-battery trailers | Single-battery trailers requiring enhanced safety | Dual-battery trailers; trailers needing battery isolation |
Functionality and Purpose of the Battery Switch: Battery Switch On Travel Trailer Function
The battery switch in your travel trailer is a crucial component for managing power flow and protecting your batteries and sensitive electronics. It acts as a central control point, allowing you to selectively connect and disconnect your house batteries from the chassis battery and external power sources like shore power or a generator. This control prevents unwanted battery drain and safeguards your equipment from potential damage.This switch effectively isolates your house batteries (used for interior lights, appliances, and other 12V systems) from the chassis battery (which powers the trailer’s brakes and lights).
This isolation is key to preventing issues like draining your house batteries while driving or inadvertently draining your chassis battery when parked. The switch also lets you control whether external power sources charge your house batteries or whether they bypass them entirely.
Battery Switch Isolation and Power Management
The primary function of the battery switch is to isolate the house battery bank from other power sources. This isolation prevents several problems. For instance, if your house batteries are deeply discharged, they can draw current from the chassis battery, potentially leaving you stranded with no brakes. Similarly, leaving the house batteries connected to the chassis battery while driving could drain the house batteries unnecessarily.
The switch allows you to completely disconnect the house batteries when not in use, preventing parasitic drain. When connected to shore power, the switch enables the charging of your house batteries while preventing any back-feeding into the chassis battery. The ability to selectively connect and disconnect the house batteries to various power sources provides essential flexibility and control over your RV’s electrical system.
Scenarios Requiring Battery Switch Use
Several situations highlight the importance of a properly functioning and utilized battery switch. For example, imagine you’ve been boon-docking (off-grid camping) for several days and your house batteries are low. Before connecting to shore power at a campground, switching off your house batteries prevents any potential back-feeding from the low batteries into the shore power system, potentially damaging sensitive electronics connected to shore power.
Conversely, if you’re storing your travel trailer for an extended period, turning off the battery switch prevents slow, unnoticed battery drain from parasitic loads, ensuring your batteries remain charged and ready for your next trip. Another critical scenario involves preventing damage to sensitive electronics. By isolating the house batteries, you prevent voltage fluctuations or surges from affecting delicate devices.
Wiring Diagrams and Schematics
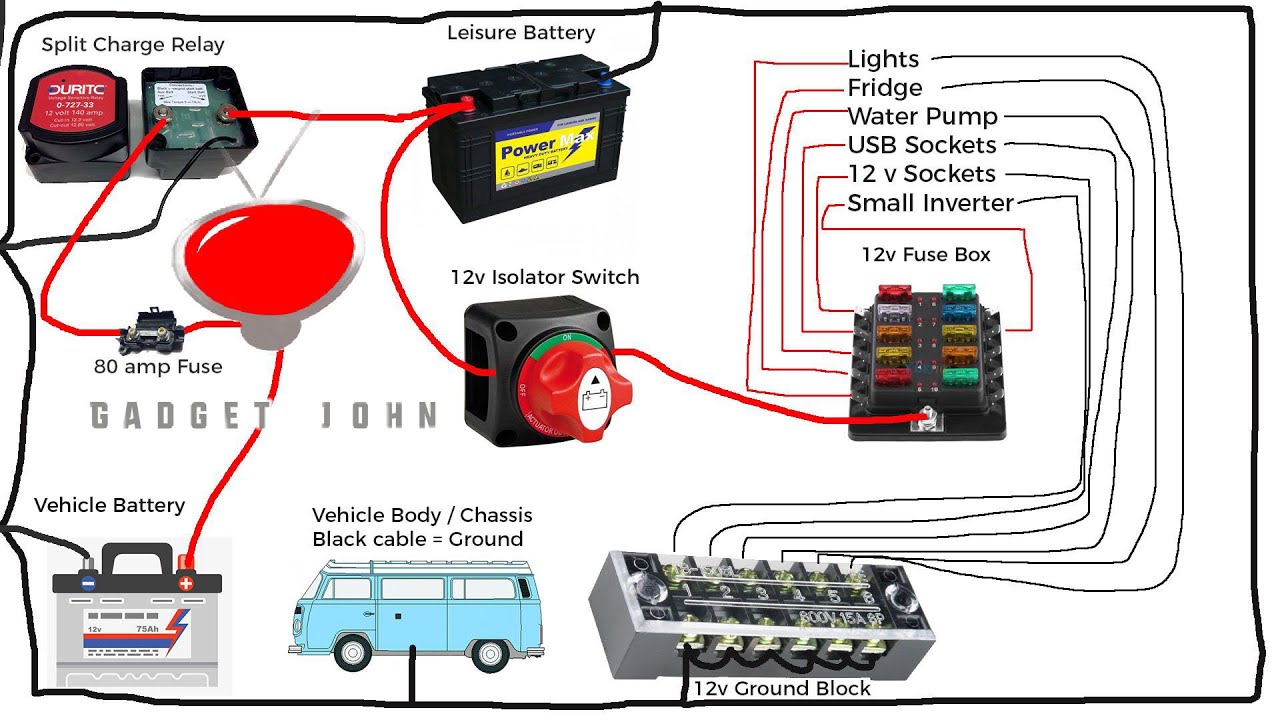
Understanding the wiring in your travel trailer’s electrical system is crucial for safe and efficient operation. Properly wired battery switches are key to managing power sources and preventing damage. These diagrams provide a visual representation of how different components connect, allowing you to troubleshoot problems or plan upgrades.
Simple Battery Switch Wiring Diagram
This diagram illustrates a basic setup connecting a battery switch to house batteries, a chassis battery, and external power (shore power). Imagine a simple three-way switch controlling power flow.The diagram would show:* Shore Power: A line representing the shore power connection, entering a fuse or circuit breaker.
Battery Switch
So, you’re hitting the road in your travel trailer? Awesome! First things first: make sure you understand your battery switch on travel trailer function , it’s crucial for managing your power. Once you’ve got that sorted, it’s time to think about entertainment. For the serious music lover, check out this guide on creating an audiophile travel aetup – you’ll want tunes that sound as good on the road as they do at home.
Proper power management and great sound – that’s the key to a killer road trip!
A three-position switch labeled “Off,” “House,” and “Both.”
House Batteries
So, you’re gearing up for a road trip? Awesome! First things first: make sure you understand your travel trailer’s power, checking out this guide on the battery switch on travel trailer function is key to avoiding dead batteries. Once you’ve got that sorted, think about setting up your entertainment; a killer audiophile travel setup can really elevate the experience.
Don’t forget to pack your favorite tunes!
A battery bank (typically two 12V batteries in parallel) clearly labeled.
Chassis Battery
A single 12V battery, separate from the house batteries, labeled accordingly.
Wiring
Lines connecting each component, clearly labeled with appropriate wire gauge and color codes (e.g., positive (+) and negative (-) wires).The switch’s positions would control which batteries are connected to the house system. “Off” disconnects everything, “House” connects only the house batteries, and “Both” connects both house and chassis batteries. This setup allows for independent control of battery usage.
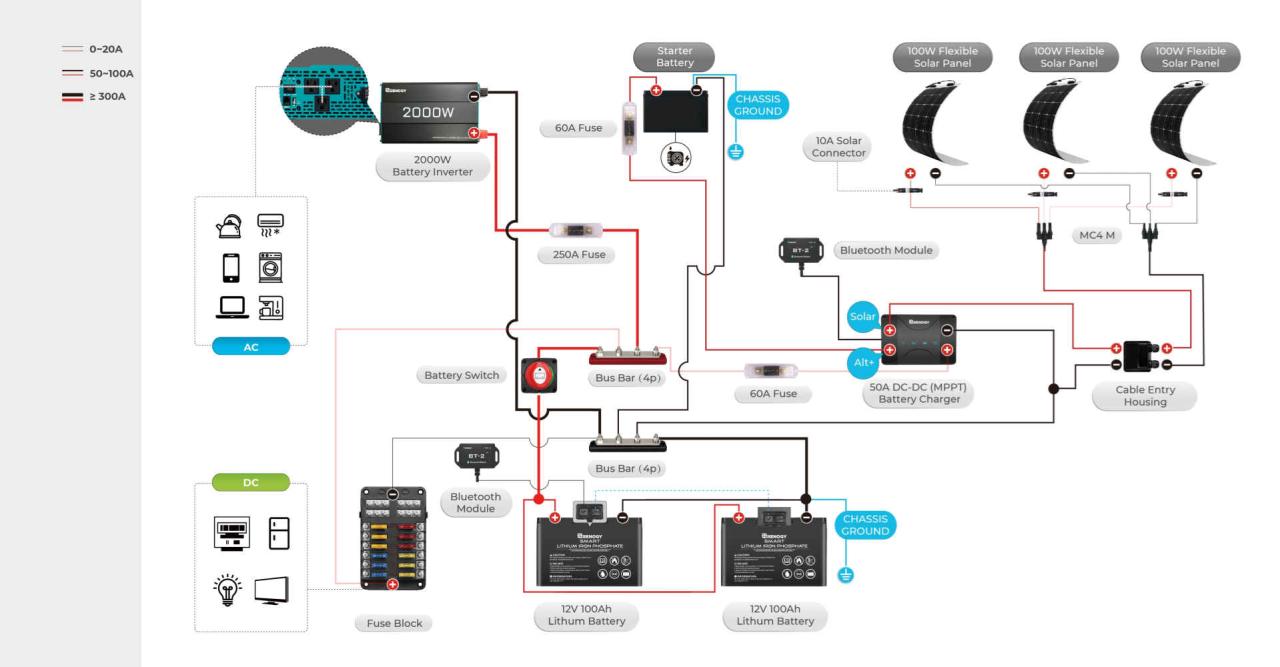
Complex Battery Switch Wiring Diagram with Solar and Inverter
This diagram adds complexity by incorporating a solar panel system and an inverter. This allows for charging the batteries from solar power and converting DC power from the batteries to AC power for household appliances.The diagram would show:* Solar Panels: Multiple solar panels connected in series or parallel, depending on voltage requirements, leading to a solar charge controller.
Solar Charge Controller
A device regulating the power from the solar panels to the house batteries.
Battery Switch
A three-position switch (or a more sophisticated switch with additional options) similar to the previous diagram.
House Batteries
The house battery bank.
Inverter
A device converting DC power from the batteries to AC power.
AC Loads
A representation of household appliances powered by the inverter.
Chassis Battery
The chassis battery, separate from the house batteries.
Shore Power
Shore power connection with a fuse or circuit breaker.
Wiring
All connections clearly labeled, including positive and negative wires, and indicating appropriate wire gauges for each circuit. This would also include fuses or circuit breakers at various points for safety.The inclusion of a solar charge controller ensures that the solar panels charge the batteries efficiently and safely, while the inverter allows use of AC appliances. The battery switch remains central to managing power flow between the various sources and loads.
A properly designed and labelled diagram clarifies the complex interactions between these components.
Maintenance and Upkeep of the Battery Switch
Keeping your travel trailer’s battery switch in top condition is crucial for reliable power and preventing costly repairs. Regular maintenance ensures a safe and efficient power supply for your adventures. Neglecting this simple task can lead to corrosion, loose connections, and ultimately, battery failure.Regular cleaning and inspection are vital for preventing corrosion and other issues that can affect the battery switch’s performance and longevity.
Corrosion buildup can impede current flow, leading to reduced power and potential damage to the switch and connected components. Similarly, loose wires can cause intermittent power loss or even create a fire hazard.
Battery Switch Cleaning and Inspection
A visual inspection should be performed at least twice a year, or more often if you use your trailer frequently in harsh conditions (e.g., salty coastal areas, dusty environments). Look for signs of corrosion, such as white or green powdery deposits on the terminals or the switch itself. Check all wire connections for tightness and signs of damage. Use a wire brush to carefully clean any corrosion from the terminals and the switch housing.
For stubborn corrosion, a baking soda and water paste can be effective. After cleaning, apply a thin layer of dielectric grease to the terminals to prevent future corrosion. This grease helps repel moisture and keeps the connections clean and efficient.
Tightening Connections and Checking for Loose Wires
Loose connections are a common cause of electrical problems in travel trailers. Periodically check all connections associated with the battery switch. This includes the wires connecting to the battery, the switch itself, and any other devices wired into the system. Use the appropriate size wrench or socket to firmly tighten all nuts and bolts. Do not overtighten, as this could damage the terminals or wires.
If you find any damaged wires, replace them immediately with appropriately sized and rated wire. Remember to disconnect the battery’s negative terminal before working on any electrical components.
Battery Switch and its Interaction with other Systems
Your travel trailer’s battery switch isn’t an isolated component; it’s a central player in managing power flow throughout your RV’s electrical system. Understanding its interaction with other systems is crucial for safe and efficient operation. This section will detail how the battery switch works in conjunction with your converter, inverter, and solar charge controller, and what can happen if it’s not used correctly.The battery switch acts as the main on/off control for your house batteries.
This means it directly affects the power available to all downstream devices. Incorrect operation can lead to a variety of problems, ranging from minor inconveniences to significant damage to your equipment. For instance, accidentally leaving the switch in the “off” position while connected to shore power might seem harmless, but it could prevent your batteries from charging. Conversely, leaving it on while disconnected from shore power could drain your batteries completely.
Converter Interaction
The converter transforms 120-volt AC power from your campsite’s electrical hookup into 12-volt DC power to charge your batteries and run your 12-volt appliances. With the battery switch off, the converter will still receive AC power, but it won’t be able to charge the house batteries. Leaving the switch on while the converter is malfunctioning could potentially overload the system and damage both the converter and your batteries.
Inverter Interaction
The inverter converts 12-volt DC power from your batteries into 120-volt AC power to run your AC appliances. With the battery switch off, the inverter will be unable to operate, regardless of the battery charge level. Improper use, such as running high-wattage appliances with a low battery charge and the switch on, could lead to battery damage or even a fire.
Solar Charge Controller Interaction
The solar charge controller regulates the flow of power from your solar panels to your batteries. The battery switch is usually positionedafter* the solar charge controller in the circuit. While the solar charge controller will still receive power from the solar panels even with the battery switch off, it will not be able to charge the batteries. This means that the solar panels won’t be able to replenish the battery’s charge.
Consequences of Improper Battery Switch Use
Improper use of the battery switch can result in several issues. Understanding these potential consequences is vital for preventing costly repairs and ensuring the safety of your RV.
- Dead Batteries: Leaving the switch on when not connected to shore power or a generator will drain your batteries.
- Overloaded Systems: Incorrect switch operation can lead to an overload on the converter, inverter, or other components, causing damage or failure.
- Inoperative Appliances: With the switch off, many of your 12-volt appliances will not function.
- Failure to Charge Batteries: Leaving the switch off prevents the batteries from charging, even when connected to shore power or using solar panels.
- Potential Fire Hazard: In extreme cases, improper switch use combined with other factors (like a faulty converter or overloaded system) can create a fire risk.
Choosing the Right Battery Switch
Picking the perfect battery switch for your travel trailer is crucial for safe and reliable power management. The wrong switch can lead to overheating, insufficient power, or even dangerous electrical issues. This section will guide you through the key factors to consider when making your selection.
Several factors influence the choice of a battery switch. Understanding your trailer’s electrical demands and the characteristics of available switches is paramount for a successful installation.
Amperage Rating Considerations, Battery switch on travel trailer function
The amperage rating of your battery switch is perhaps the most critical factor. This rating dictates the maximum current the switch can safely handle. Underestimating this value risks overheating and potential failure, potentially damaging your batteries or other electrical components. Overestimating it leads to unnecessary expense. To determine the appropriate amperage, you need to assess your trailer’s total electrical load.
This involves adding up the amperage draw of all devices and appliances that will be powered by your batteries (lights, water pump, refrigerator, etc.). It’s always wise to add a safety margin – choosing a switch with a higher amperage rating than your calculated total load ensures a longer lifespan and safer operation. For example, if your calculated load is 100 amps, opting for a 150-amp switch provides a buffer.
Number of Batteries and Switch Configurations
The number of batteries in your system directly impacts the type of switch you need. A single battery setup only requires a simple on/off switch, while multiple batteries necessitate a switch capable of isolating or combining them. Common configurations include switches with two battery posts for a dual-battery system or switches with multiple positions to control various battery banks.
Consider future expansion: If you anticipate adding more batteries later, a switch with extra terminals will save you from having to replace the entire unit.
Mounting Location and Physical Dimensions
Before purchasing, carefully consider the available space for mounting the switch within your travel trailer. Measure the dimensions of the switch and ensure you have sufficient clearance for installation and easy access for maintenance. The location should be easily accessible, well-ventilated to prevent overheating, and protected from moisture or accidental damage. Choose a mounting location that is both convenient and safe.
Decision Tree for Battery Switch Selection
The following decision tree can help you systematically choose the right battery switch:
- Determine Total Amperage Draw: Calculate the total amperage draw of all devices powered by your batteries. Add a 20-30% safety margin.
- Number of Batteries: How many batteries will be connected to the switch? (Single, Dual, Multiple)
- Switch Type: Based on the number of batteries, select an appropriate switch type (single-battery switch, dual-battery switch with isolating capability, multi-battery switch).
- Amperage Rating: Select a switch with an amperage rating that exceeds your calculated total amperage draw (including the safety margin).
- Mounting Location: Identify a suitable mounting location considering accessibility, ventilation, and protection from the elements.
- Physical Dimensions: Verify that the chosen switch fits the available space.
- Additional Features: Consider any additional features, such as built-in circuit breakers or indicator lights.
Safety Considerations
Working with your travel trailer’s electrical system, including the battery switch, requires caution. Improper handling can lead to serious injury, from minor burns to severe electric shock, and even damage to your RV’s electrical components. Understanding the potential hazards and taking appropriate safety precautions is paramount.Improper use or malfunction of a battery switch can result in several dangers. A faulty switch might create arcing, sparking, or even overheat, potentially igniting nearby flammable materials.
A switch that fails to disconnect the battery completely could lead to unexpected power surges or short circuits, damaging appliances or even causing a fire. Furthermore, working on the electrical system without proper safety measures increases the risk of accidental shocks, which can be particularly dangerous in damp or wet conditions.
Safety Equipment
Using appropriate safety equipment is crucial when working with any electrical system, especially in a confined space like a travel trailer. Proper equipment minimizes the risk of injury and helps to ensure a safe working environment.
Safety Precautions
Prior to any work on your battery switch or related electrical systems, a series of precautions should be followed. These measures significantly reduce the risk of accidents and protect you from potential harm.
- Always disconnect the negative (-) battery cable first before working on any electrical components. This minimizes the risk of accidental short circuits.
- Wear appropriate personal protective equipment (PPE), including safety glasses to protect your eyes from sparks or flying debris, and insulated gloves to prevent electric shock.
- Ensure the area is well-ventilated to prevent the buildup of potentially explosive gases, especially if working near the batteries themselves.
- Use insulated tools to avoid accidental contact with live wires. Never use metal tools unless absolutely certain the circuit is completely de-energized.
- Have a fire extinguisher readily available, rated for electrical fires (Class C), in case of an emergency.
- If you are unsure about any aspect of the work, consult a qualified RV technician or electrician. Attempting repairs beyond your skill level can be extremely dangerous.
- Before reconnecting the battery, carefully inspect all connections to ensure they are secure and free from damage. A loose connection can create a significant fire hazard.
- Never work on the electrical system while it’s raining or in damp conditions. Water significantly increases the risk of electric shock.
Mastering your travel trailer’s battery switch is a game-changer for any RVer. By understanding its function, troubleshooting common issues, and performing regular maintenance, you can ensure a reliable power supply for all your adventures. Remember, safety first – always disconnect power before working on electrical components. With the right knowledge and a little preventative care, you’ll enjoy worry-free power on the road for years to come.
Detailed FAQs
What happens if I leave my battery switch on all the time?
Leaving your battery switch on constantly can drain your house batteries, especially if you have parasitic draws (devices consuming power even when turned off). It’s best to turn it off when not using the trailer for extended periods.
How do I know if my battery switch is bad?
Signs of a bad battery switch include no power to the house batteries, flickering lights, or a blown fuse. Inspect the switch for corrosion or damage. A multimeter can help test for voltage and continuity.
Can I use a higher amperage battery switch than recommended?
While it might seem safer, using a higher amperage switch isn’t necessary and could potentially cause problems. Always use the amperage rating recommended by the manufacturer for your specific trailer’s electrical system.
What’s the difference between a single-pole and double-pole switch?
A single-pole switch controls one circuit (positive or negative), while a double-pole switch controls both positive and negative circuits simultaneously, offering better safety and isolation.
